For this recipe you’ll need:
• Vanilla and chocolate cupcakes
• Chocolate and vanilla frosting
• Vanilla wafer cookies
• Assorted candies for ears and bows
• Food coloring
• A pint sized glass
• A knife
• A spoon
• Spatula
• Scissors
• Gallon and sandwich sized bag
Eep the Mouse cupcake:
Add one teaspoon of blue food coloring to store-bought vanilla frosting and whisk, or add to homemade butter cream frosting.
Make a piping bag. Put one corner of a gallon sized plastic bag down in the bottom of your cup and fold the bag open over the edges. Scoop in your blue frosting until the bag is full. Lift your bag out, squeeze out the air and zip the bag shut.
Squeeze the frosting down to the bottom corner of the bag, and then snip off the end.
Starting from the edge of the cupcake, frost gently in a spiral motion until you reach the cupcake’s center.
To make the face, prepare two piping bags: one with black frosting, and one with white.
Using black frosting, draw little eyebrows, eyes, a nose and a mouth on your vanilla wafer cookie. Use white frosting to add a little sparkle to his eye.
Place your cookie in the center of your cupcake.
To make the ears, cut a chocolate circle in half and place them.
Trace over the chocolate with blue frosting, and finish with two blue candies.
Mother Goose Club’s Teddy Bear cupcake:
Use a chocolate cupcake.
Make a piping bag with chocolate frosting, frost starting at the edge and work your way to the center.
Place the cookie face and chocolate circle ears. Trace over the ears with chocolate frosting.
For Teddy’s special bow, add two blue candy-covered chocolates.
Baa Baa Sheep cupcake:
Use a vanilla cupcake. Add eight drops of red, and two drops of blue to vanilla frosting to get the right color. Make a piping bag.
Make a series of dots with pink frosting around the edge of the cupcake.
Using your spoon, smear each dot towards the center of the cupcake.
Make a second circle of dots, just like the first in the center.
Add the cookie face and two purple chocolate-covered candies for ears.
]]>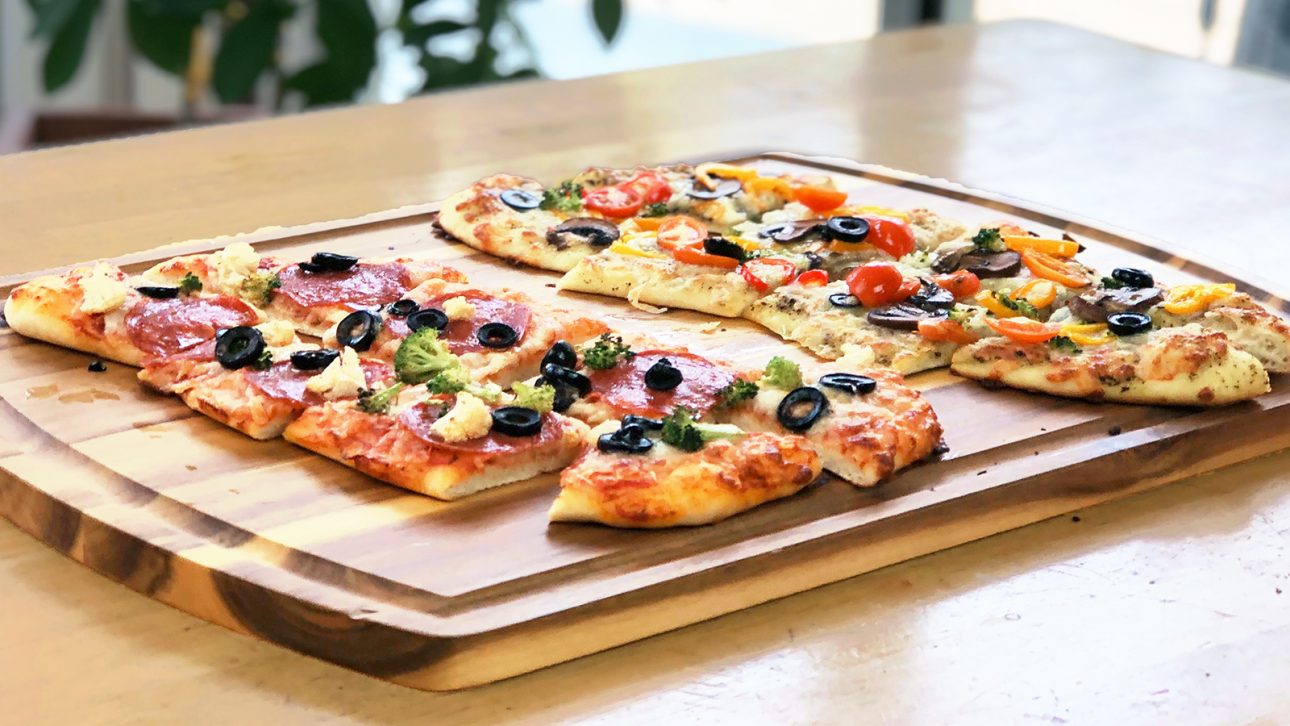
The next time you are at the grocery store, pick up a few key ingredients and you might enjoy your next pizza night without the carb hangover in the morning. The following recipe is so simple, you can have pizza on your dinner table faster than if you ordered delivery. Everyone can pick their own toppings and the leftovers make a great school lunch for the kids. You can also make this in a toaster oven if you don’t have a conventional oven available.
Total time: 25 minutes
Servings: 4
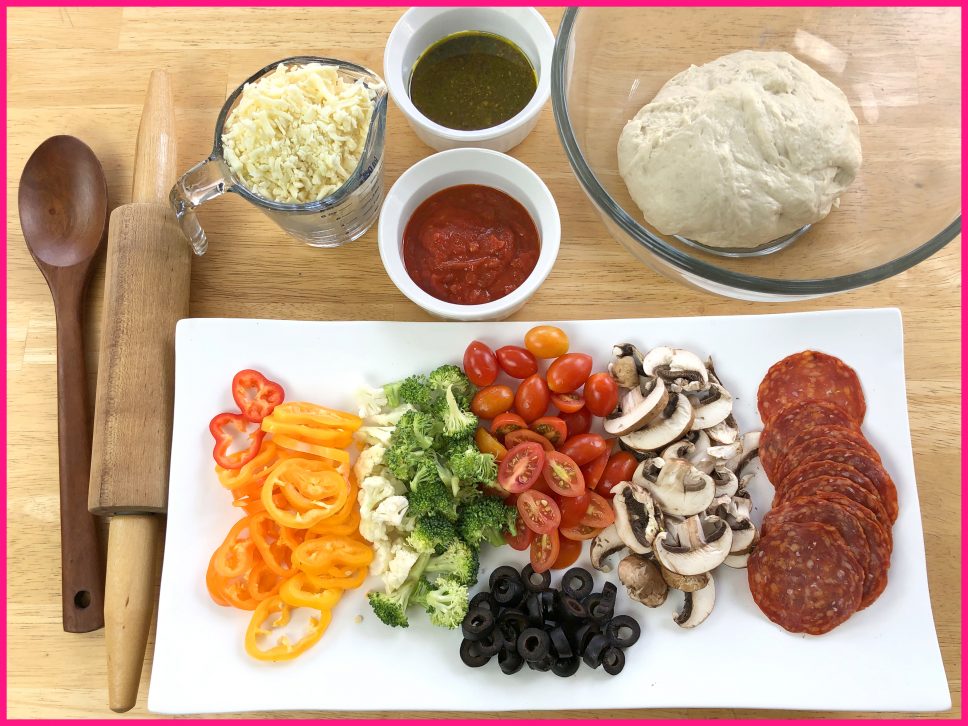
- 16 oz premade pizza dough
- ½ cup pizza sauce
- ½ cup pesto sauce
- 1 cup button mushrooms
- 1 cup bell pepper
- ½ cup black olives
- 8 oz shredded mozzarella
- 1 cup fresh tomatoes
- 1 cup broccoli and cauliflower
- 6 oz sliced pepperoni
- 2 tablespoons flour
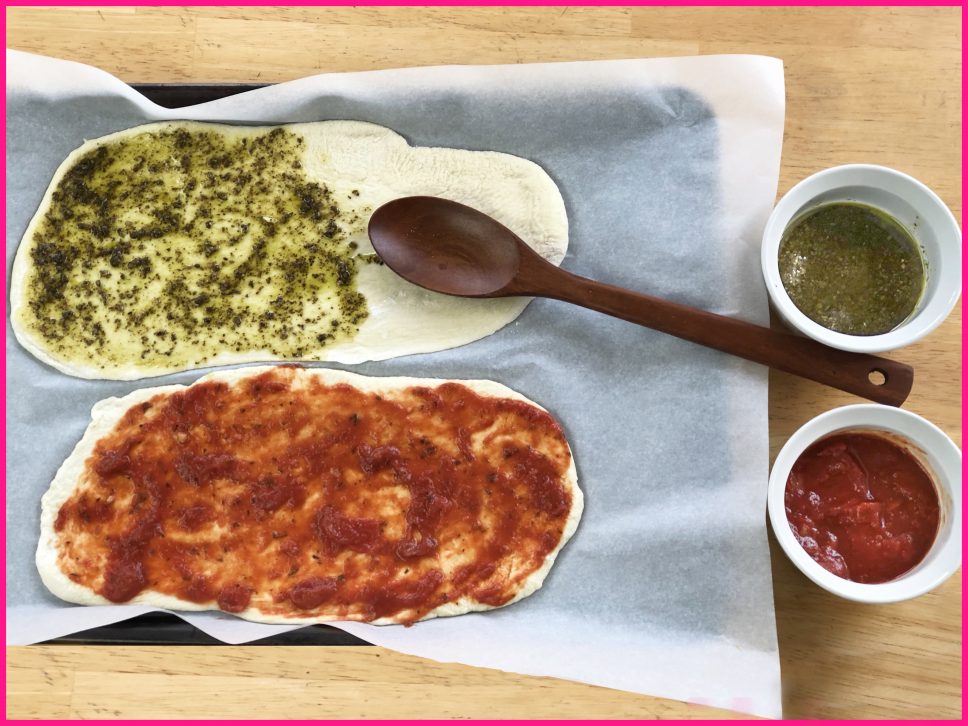
Preheat your oven to 475, then divide the premade dough into two round balls. Dust your workstation with flour to avoid sticking, and roll each piece of dough into an oval shape.

Using a large spoon, apply either pizza sauce or pesto onto the dough, leaving about ¼ inch of space around the edges.
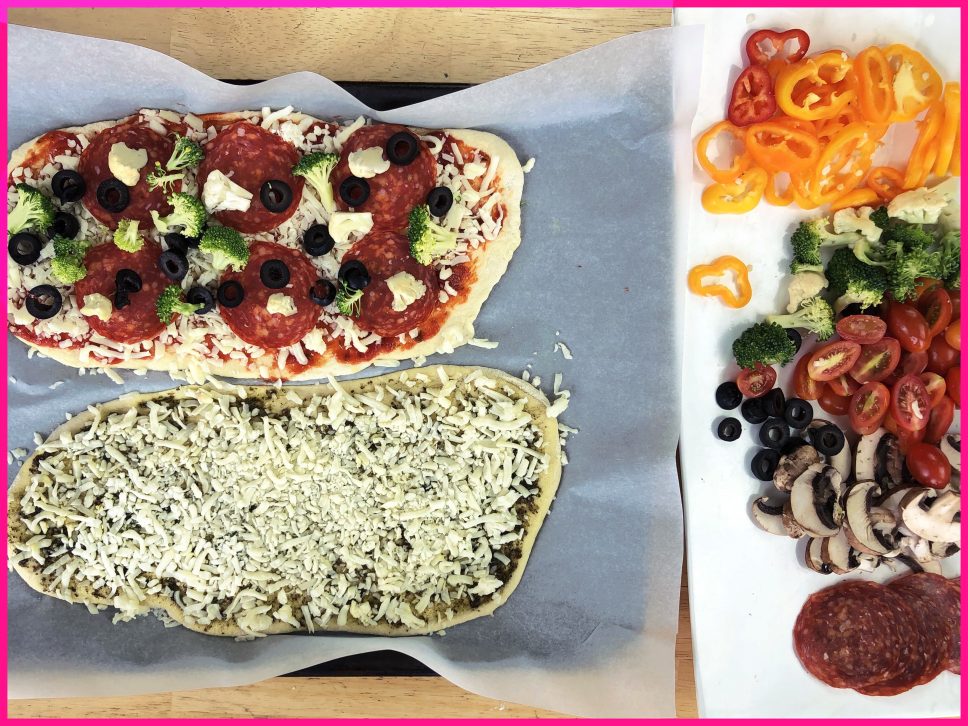
Sprinkle the mozzarella cheese over the sauce liberally first, then pepperoni followed by your veggies. Try not to crowd your toppings too much as they will not be in the oven long. If you plan to use sausage or chicken, I’d recommend browning it in a pan beforehand to make sure everything is properly cooked.
Slide your creations into the oven for 8-10 minutes. When the edges of the crust and the cheese starts to brown, you are done!

Don’t forget to share your creation with us on social media! We would love to see what you and your family made together on Facebook, Instagram, or email us at [email protected].
]]>
Encouraging kids to eat their vegetables can be quite the challenge, but here are five tips I’ve found to be quite effective when dealing with a stubborn eater!
Tip 1: Mix vegetables with foods they already love
Instead of regular pizza, I make a deep-dish pan pizza for my nephews and niece. The sauce is rather thick so I’m able to chop up a whole green pepper and stir it into the sauce. Because each serving is as dense as a piece of pie, they don’t even notice the extra serving of greens they’re eating!
Or, next time you make spaghetti, try adding small portions of zucchini pasta along with their favorite noodles. And throw in some small pieces of cauliflower with the next serving of orange chicken. They likely won’t complain and may even grow to like the veggie versions of their favorite foods.
Tip 2: Experiment with different presentations
Even if your kids have resisted eating certain veggies, changing up how they are presented can make a big difference. They may turn their nose at salads, but it’s harder to turn down shredded lettuce and diced tomatoes on top of delicious-looking tacos. One of my nephews intensely dislikes carrots and broccoli, but gobbled them up when I cut them both into half-inch pieces and mixed them into garlic noodles!
Tip 3: Get kids involved in the cooking
I’ve found that kids are much more willing to eat dishes they helped make, even if that dish contains vegetables they’ve considered their mortal enemy! There’s something about them getting hands-on with their food that becomes an effective form of persuasion. So let them brush a little olive oil on grilled eggplant slices, and ask for their help tossing some greens in a large bowl.
Tip 4: Tell them how important vegetables are for growth
Vegetables contain nutrients and antioxidants that are extremely beneficial for growth. Young children usually want to grow bigger as fast as possible! Remind them that if they want to become as tall as their sibling, as fast as their favorite professional athlete, or as strong as a superhero, then they need to eat their veggies!
While there are endless ideas on this topic, the important thing is to keep trying. I’d also highly recommend directly asking kids what might encourage them to eat more veggies – you might learn from what they tell you!
]]>
Rachel is a Mother Goose Club producer and former teacher based in Las Vegas, Nevada. She enjoys hosting celebrations for all ages centered around crafts and activities. Rachel is excited to share her favorite things with you, and hopes to inspire your family to get creative!
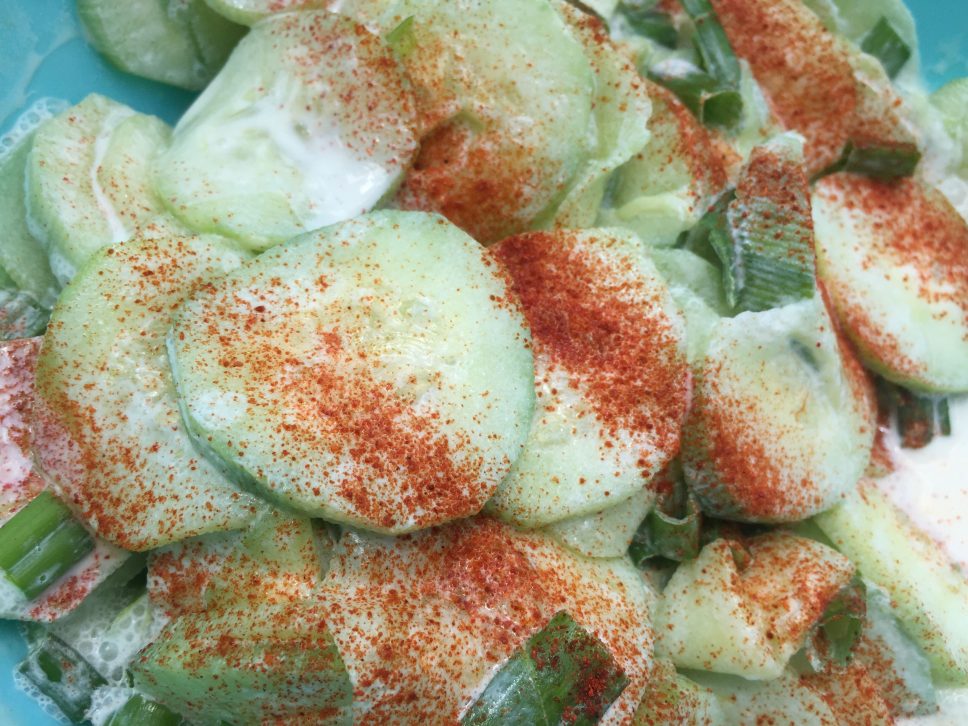
When I was a little girl, we’d run hard in the green grass, climb trees and make up dance routines until we were called in to dinner. Hearty, hot home cooked meals were prepared daily by my German grandma, Laura.
When we charged through the patio door into the kitchen, the intoxicating smell of onions and garlic immediately made you feel loved, even if it made your stomach grumble. While we’d wait for hot entrees to cool, we’d indulge in this refreshing cucumber salad.
I love how this pretty green salad balances out the other savory and sweet flavors you traditionally find at a BBQ, making it perfect for all your summer gatherings. The ingredients outlined below are simple, inexpensive and easy to throw together. It’s cool, crunchy, has the tiniest bite from the garlic (you can add more or less depending on your obsession – mine is quite strong). I hope you enjoy this recipe as much as my family will be this weekend!
Ingredients
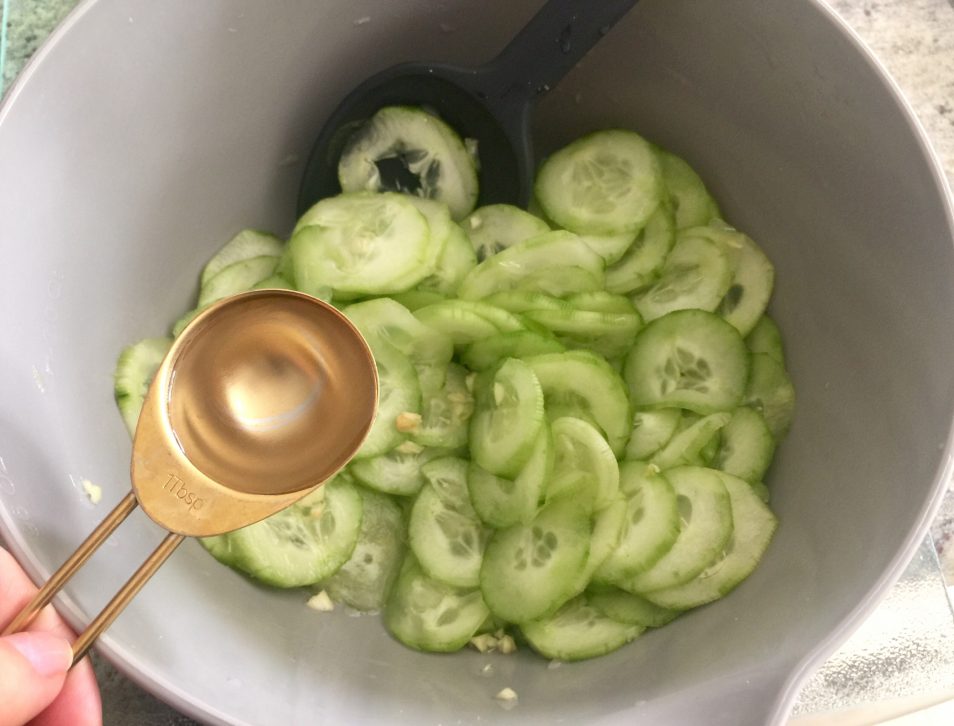
- 3 large cucumbers
- 1 teaspoon salt
- 1 tablespoon white vinegar
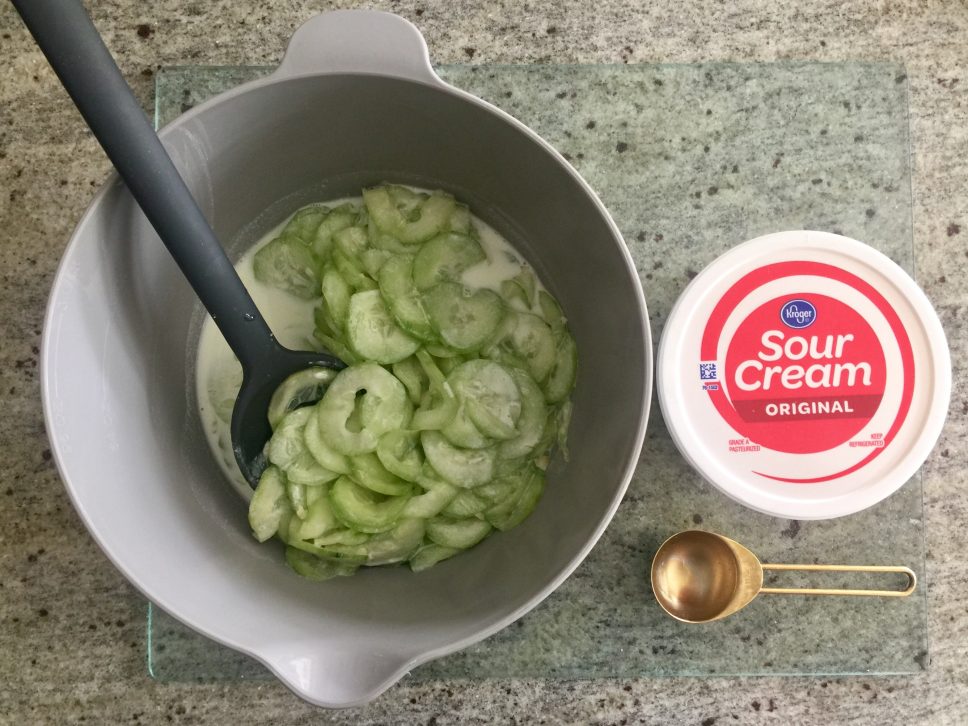
- 3 tablespoons sour cream
- 3 cloves minced garlic
- 1 bunch of green onions diced
- Paprika for garnish
Peel your cucumbers and slice them very thin. Sprinkle with salt, mix very well and allow to stand until soggy.
Add all other ingredients (saving chives and paprika for ganrish) mix, garnish, serve and enjoy!

Rachel is a Mother Goose Club producer and former teacher based in Las Vegas, Nevada. She enjoys hosting celebrations for all ages centered around crafts and activities. Rachel is excited to share her favorite things with you, and hopes to inspire your family to get creative!
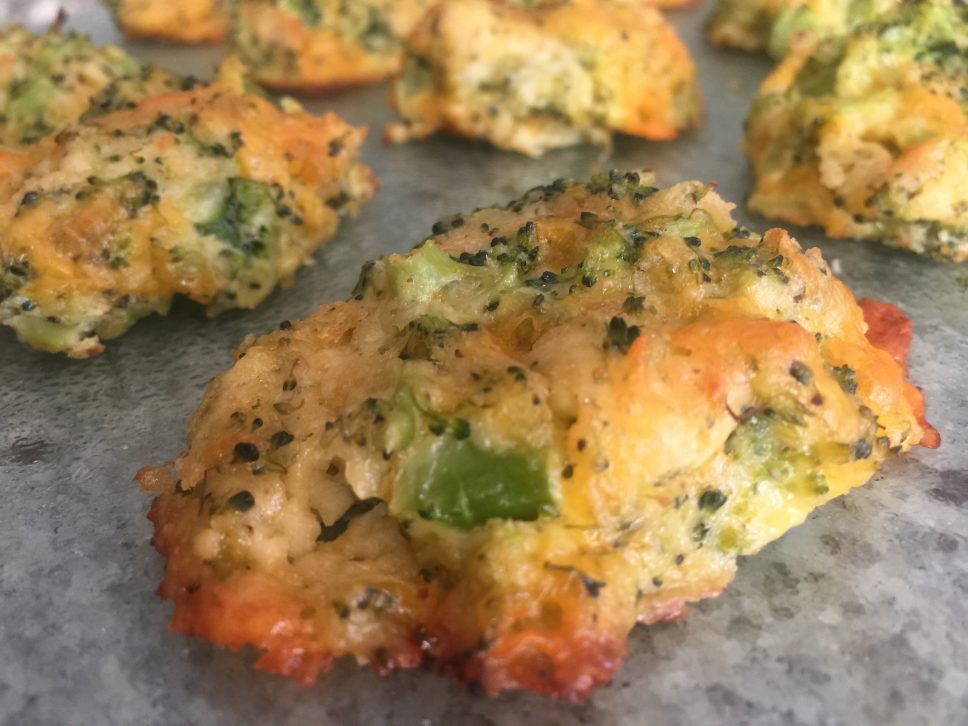
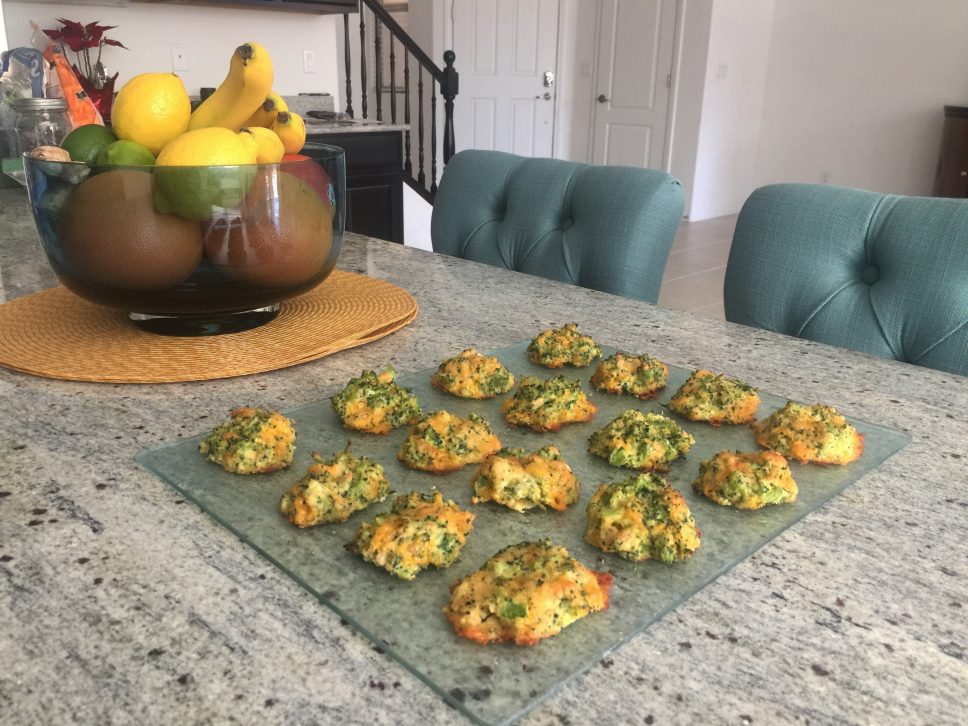
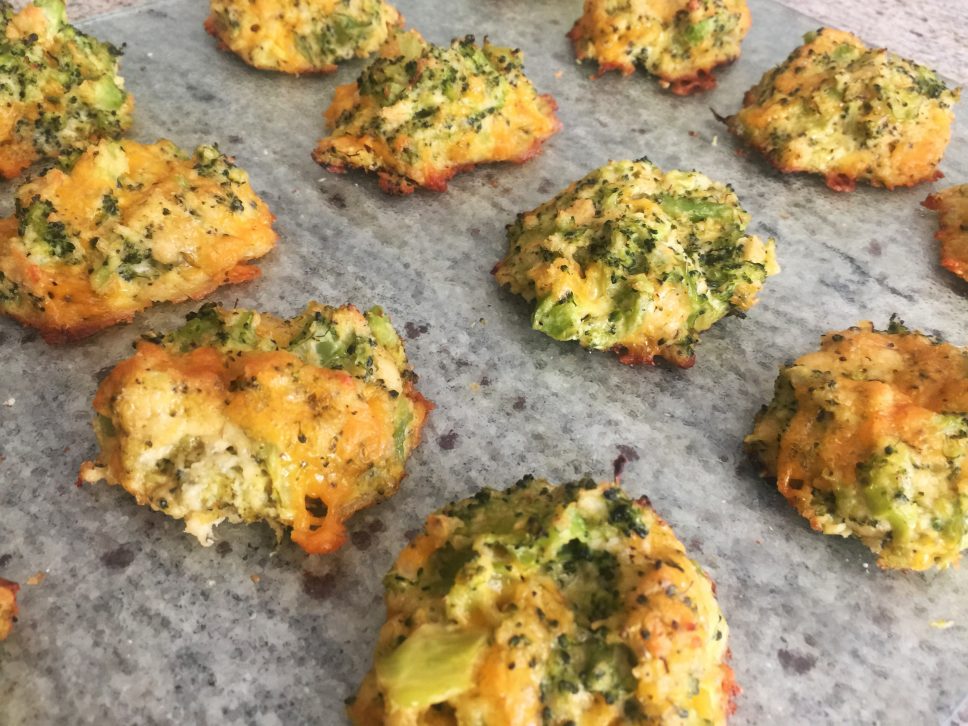
I seriously love these broccoli cheddar egg bites. They’re so flavorful (I think it’s all about the lemon zest), the recipe is simple and it yields so many yummy bites – they’re great fresh out the oven for brunch (great for showers, Mother’s Day or Father’s Day) or reheated on weekday mornings for easy, no-mess energy when you’re on the go. I’ve been making these free form on a baking sheet, but you can do muffin tins too (see how in the recipe I originally found that started this whole love affair).
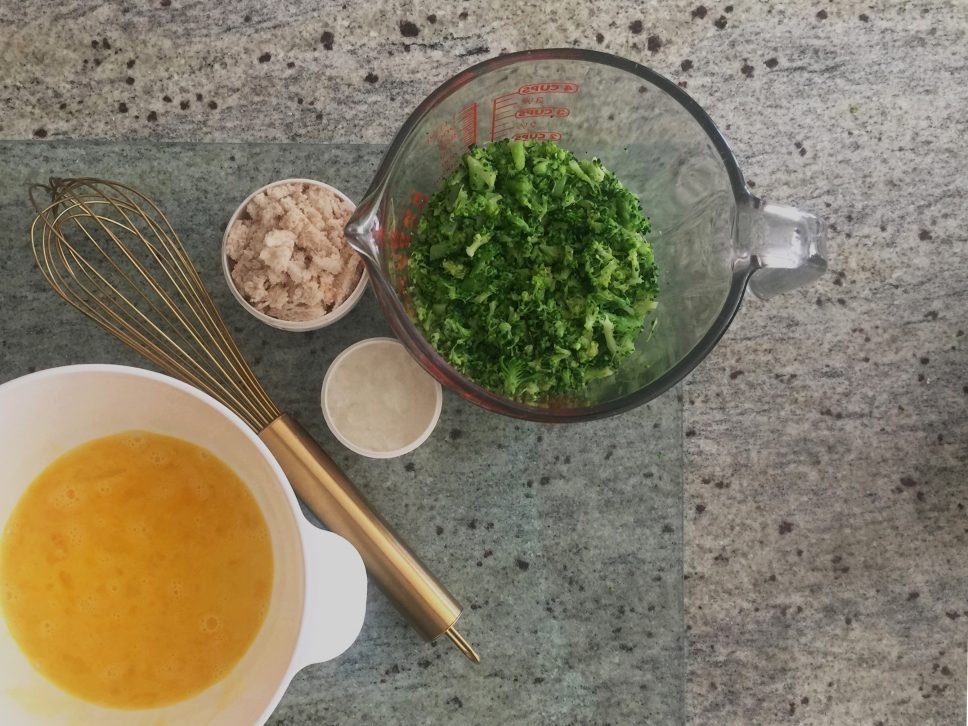
- 4 cups broccoli
- 2 eggs, lightly beaten
- 1/2 cup bread, torn in small pieces
- 1/4 cup onion, grated
- 1/4 cup mayo
- 1 cup sharp shredded cheddar cheese
- 2 teaspoons lemon zest
- 1/2 teaspoon salt
- 1/4 teaspoon ground black pepper
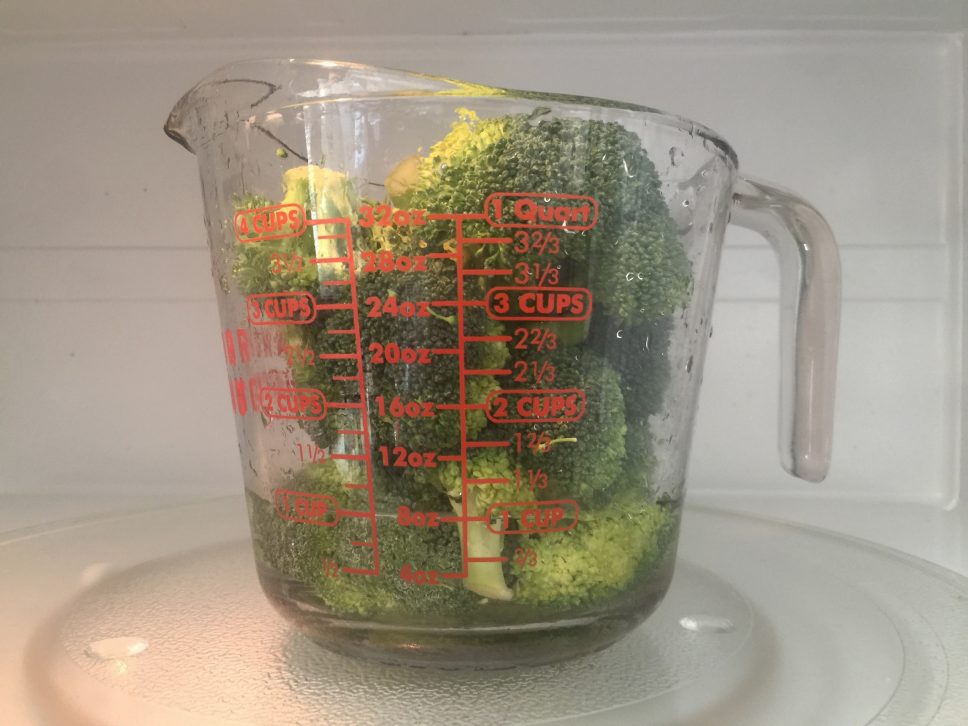
Preheat your oven to 350, steam 4 cups of broccoli (I like to do this in my glass measuring cup in the microwave while I’m doing other things with the stove) and chop those florets up real good.
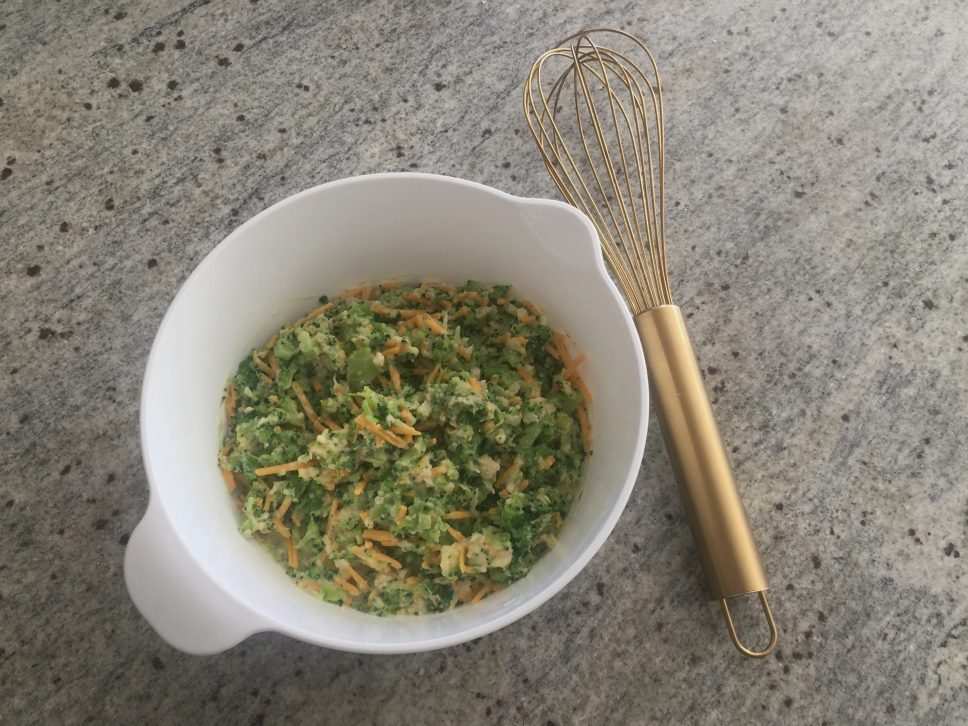
Beat your eggs and then add the torn bread, grated onion, cheese, mayo, lemon zest, salt, pepper and broccoli.
Line a large baking sheet with tin foil and coat with olive oil. Line heaping tablespoon bites on the sheet and bake at 350 for about 25 minutes until slightly golden on top. Remove the bites from the tin foil immediately.
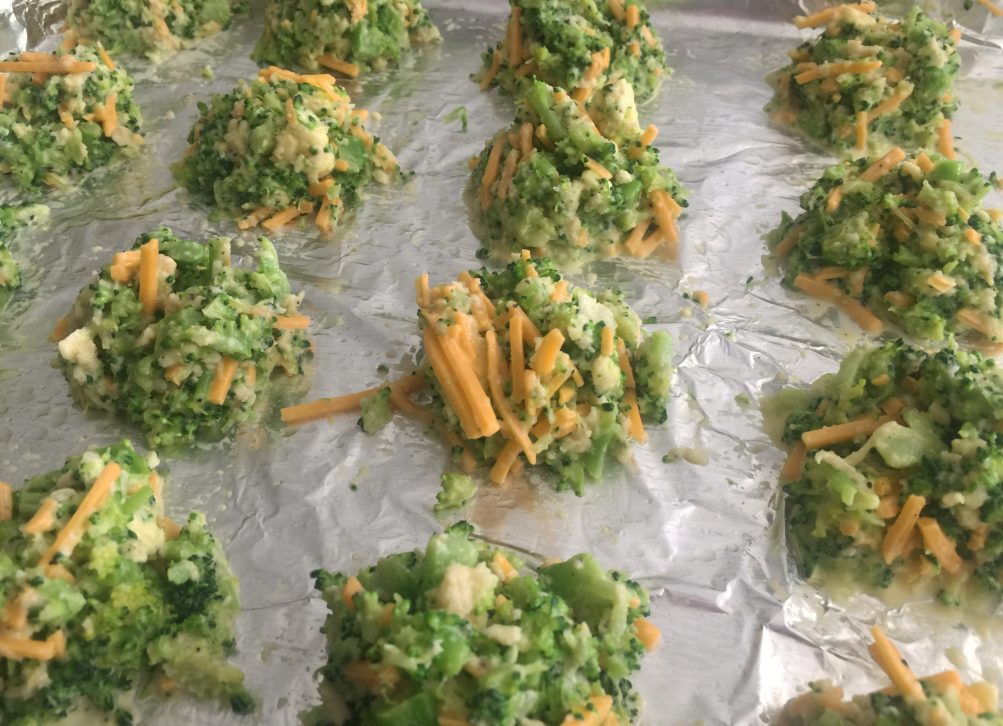
When they’re warm, they’ll come up fairly easily – wait too long and the foil can stick to the bottom (which is one of the most delicious parts).
Rachel is a Mother Goose Club producer and former teacher based in Las Vegas, Nevada. She enjoys hosting celebrations for all ages centered around crafts and activities. Rachel is excited to share her favorite things with you, and hopes to inspire your family to get creative!
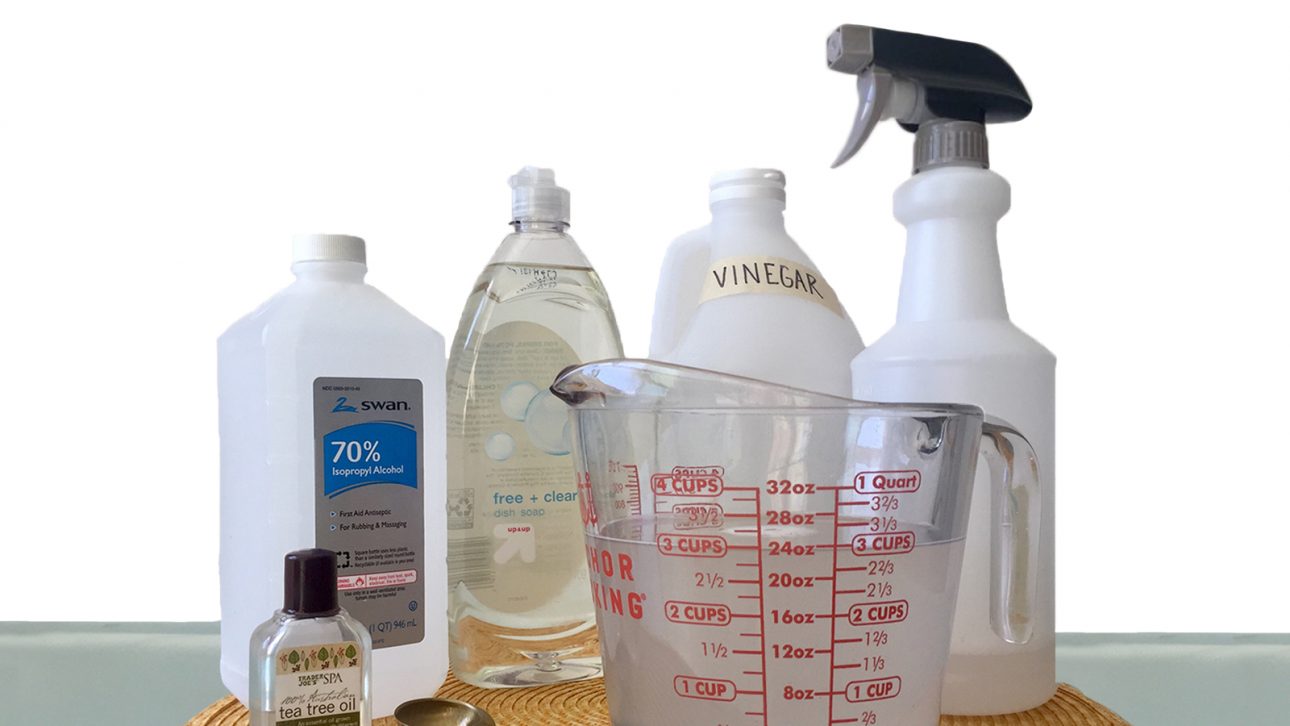
Happy spring, everyone! It’s SO time to dust off the furniture, move some stuff around and get ready for the light and new life on it’s way with the season. My grandma used to clean with a solution similar to the one I’m sharing with you today – she always made a point to tell me all you really need is water – essentially, you don’t need to buy products with chemicals, fragrances or dyes.
Today, I use this non-toxic, all-purpose cleaning spray throughout the house – I keep one generic plastic spray bottle under each bathroom sink and have one in the kitchen as well. This solution cuts through grease and minerals in water and best of all, it doesn’t leave streaks. I’ve outlined the basic and super inexpensive ingredients below. Don’t be afraid to get creative and experiment – maybe try a different essential oil or apple cider vinegar (I do prefer white vinegar for this recipe especially for the overall solution scent). I would love to hear what you try!
- Reusable spray bottle(s), like this one on Amazon
- 1 and 1/2 cups water
- 1 cup white vinegar
- 1/2 cup rubbing alcohol
- 1 teaspoon dish soap
- 1 cap-full tea tree oil
Rachel is a Mother Goose Club producer and former teacher based in Las Vegas, Nevada. She enjoys hosting celebrations for all ages centered around crafts and activities. Rachel is excited to share her favorite things with you, and hopes to inspire your family to get creative!
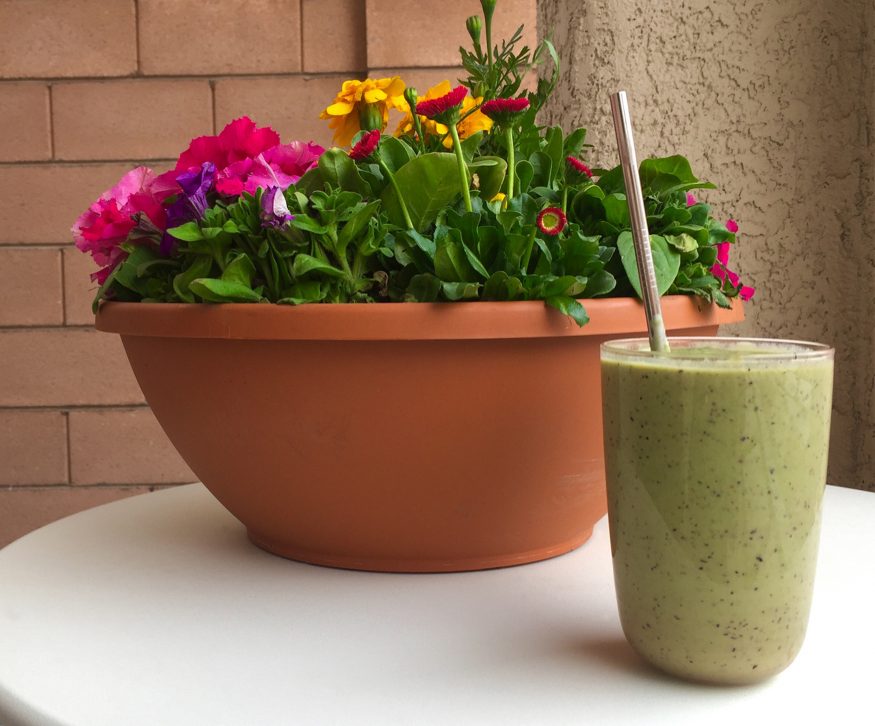
Happy St. Patrick’s Day, everyone! Today I’m celebrating with a super easy green smoothie recipe (as well as my emerald green eye shadow, lime green nails and green cheetah print jacket – I’m ready)! It’s got a light and fresh flavor with some natural sweetness (not to mention a great green color to get you in the St. Paddy’s Day spirit). This recipe yields about one and a half servings, so adjust portions as needed!
Ingredients
- 1 cup Greek yogurt (I use Fage 2%)
- 1/2 banana
- 1/2 avocado
- 1 overflowing handful of baby spinach
- 1/2 honey crisp apple
- 1/2 cup blueberries
- 1/2 cup to 1 cup ice to taste
- Juice from 1/2 a lime squeezed
- 2 tablespoons chia seeds
- Honey to taste (optional)
Simply add all the ingredients to your blender (I recommend adding in the order listed especially if like mine, your blender isn’t the strongest). Add the ice after everything else is pretty well blended and save the sweetness for the end. Pour into a glass where you can enjoy the pretty light green color and use a straw or not. I love straws, but I know they’re not great for the planet, so I opt for stainless steel straws I can wash and reuse – talk about green living!
Smoothies are a great way to get your fruits and vegetables (with their fibrous skins) in for the day, and taking 15 minutes to handle the beautiful ingredients to whip up something yummy is a treat in and of itself.
Happy St. Patrick’s Day!


Clara is a fan of Mother Goose Club and a contributing writer for our blog. She is a mother of two daughters and lives in New York City. She is passionate about food and loves to tinker with recipes to make it easy for busy moms. Her daughter, Beatrice, is often her sous-chef in the kitchen on weekends. She believes sharing the love of cooking with children can foster joy, connection, creativity and healthy eating habits.
After the holidays, many of us want to take a break from cooking. And as the temperature starts to drop, I always crave warm soups!
Vegetable soups are great because they’re easy to make, they can feed everyone in the family (including young children), and leftovers can be frozen and saved for the next meal.
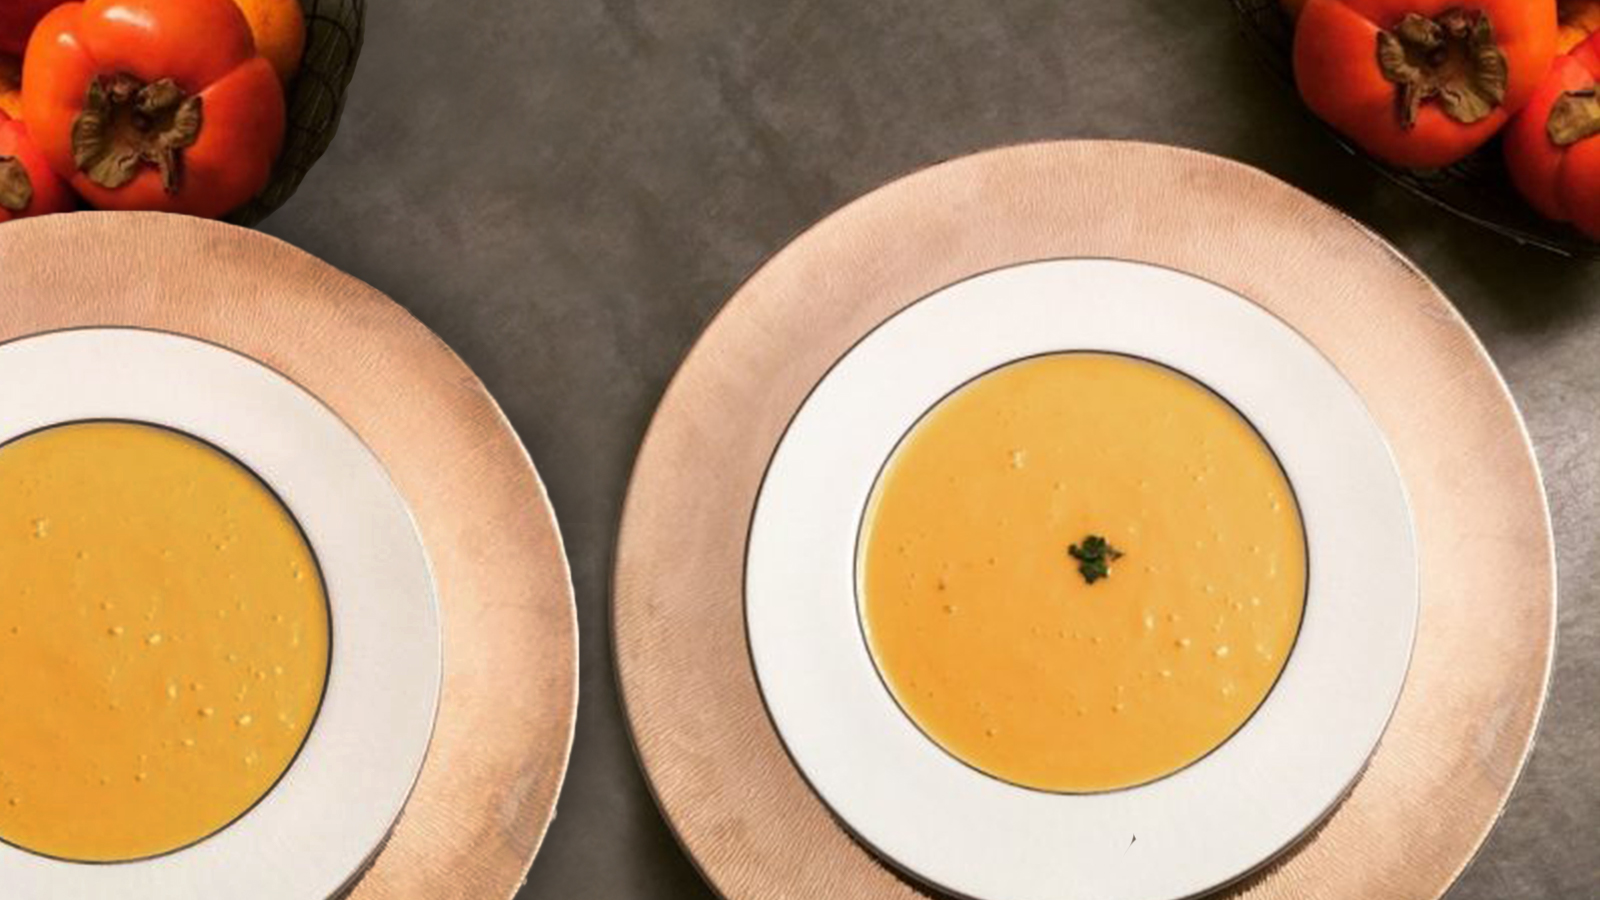
One of my favorites to make at home is organic butternut squash soup. It’s so much better than buying soup out of a can. This one has no preservatives and you can control the sodium amount. It also takes less time than you think!
Ingredients:
• 2lbs of pre-cut organic butternut squash cubes (many groceries store-sell pre-cut pieces so the hard work is done and saves a ton of time)
• 1 tablespoon of Celtic salt
• 1 tablespoon of fresh ground pepper
• 1 can of unsweetened organic coconut milk (I like the Native Forest brand below), or heavy cream


Steps:
1. Boil the squash cubes in a large pot for about 10 minutes. Make sure there’s enough water to immerse the pieces.
2. Once the squash is softened, transfer it to a bowl and let it cool for a few minutes.
3. In a blender, put the cooked pieces with 2 cups of its cooking liquid and add the can of coconut milk. Add salt and pepper.
4. Blend away for 2-3 minutes (I love to use my Vitamix blender as it can blend hot liquids – with other blenders, you may have to let the ingredients cool down before blending).
And voila! You will have yummy soup (about 6 cups, or 48 ounces) to last you for several meals. I like to save leftovers in Ziploc bags or containers. I date and freeze them, and when I’m too tired to cook, I just defrost them and dinner is ready once again!
Cheers to joyful cooking,
Clara
Clara is a fan of Mother Goose Club and a contributing writer for our blog. She is a mother of two daughters and lives in New York City. She is passionate about food and loves to tinker with recipes to make it easy for busy moms. Her daughter, Beatrice, is often her sous-chef in the kitchen on weekends. She believes sharing the love of cooking with children can foster joy, connection, creativity and healthy eating habits.
It’s often challenging to get your kids to eat a variety of foods. One thing that has helped me is a face plate!
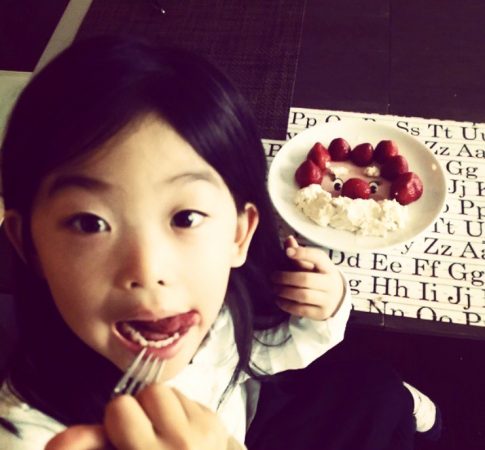
Check out the holiday plate I made with my daughter! She couldn’t wait to dig into her afternoon snack and Santa Claus never looked so delicious! I used homemade vanilla maple-cream frosting for Santa’s beard and eyebrows, and organic strawberries for his hat. Vanilla whipped cream is super easy to make with an electric mixer. I use my KitchenAid Mixer, but you can also use any handheld brand.
For some extra fun and creativity, I use Fred & Friends Food Plates, available on Amazon right below. I love using the Mrs. Fred plate to serve a variety of vegetables!

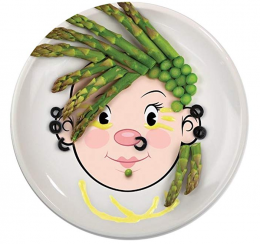
To make your very own face plate with the family, see all of the ingredients and steps below!
Ingredients:
• 1 pint heavy whipping cream (I use Organic Valley)
• 1 teaspoon vanilla extract
• 2 tablespoons organic maple syrup
• Organic strawberries
Steps:
1. Start whipping the cream slowly in the mixer, gradually increasing the speed.
2. Once the cream starts to stiffen, mix in vanilla extract and maple syrup for flavor. If you don’t have time, you can use a store-bought whipped cream – I like the 365 Whole Foods brand. If you’re dairy-free, you can use whipped cream made with almond milk or coconut milk.
3. Cover Mr. or Mrs. Fred’s jawline and eyebrows with whipped cream, and the hairline with strawberries.
That’s it! So simple! Have fun decorating face plates using healthy (or not so healthy) ingredients – it’s a great opportunity to get creative and a little silly with the family!
Cheers to joyful eating,
Clara
Clara is a fan of Mother Goose Club and a contributing writer for our blog. She is a mother of two daughters and lives in New York City. She is passionate about food and loves to tinker with recipes to make it easy for busy moms. Her daughter, Beatrice, is often her sous-chef in the kitchen on weekends. She believes sharing the love of cooking with children can foster joy, connection, creativity and healthy eating habits.
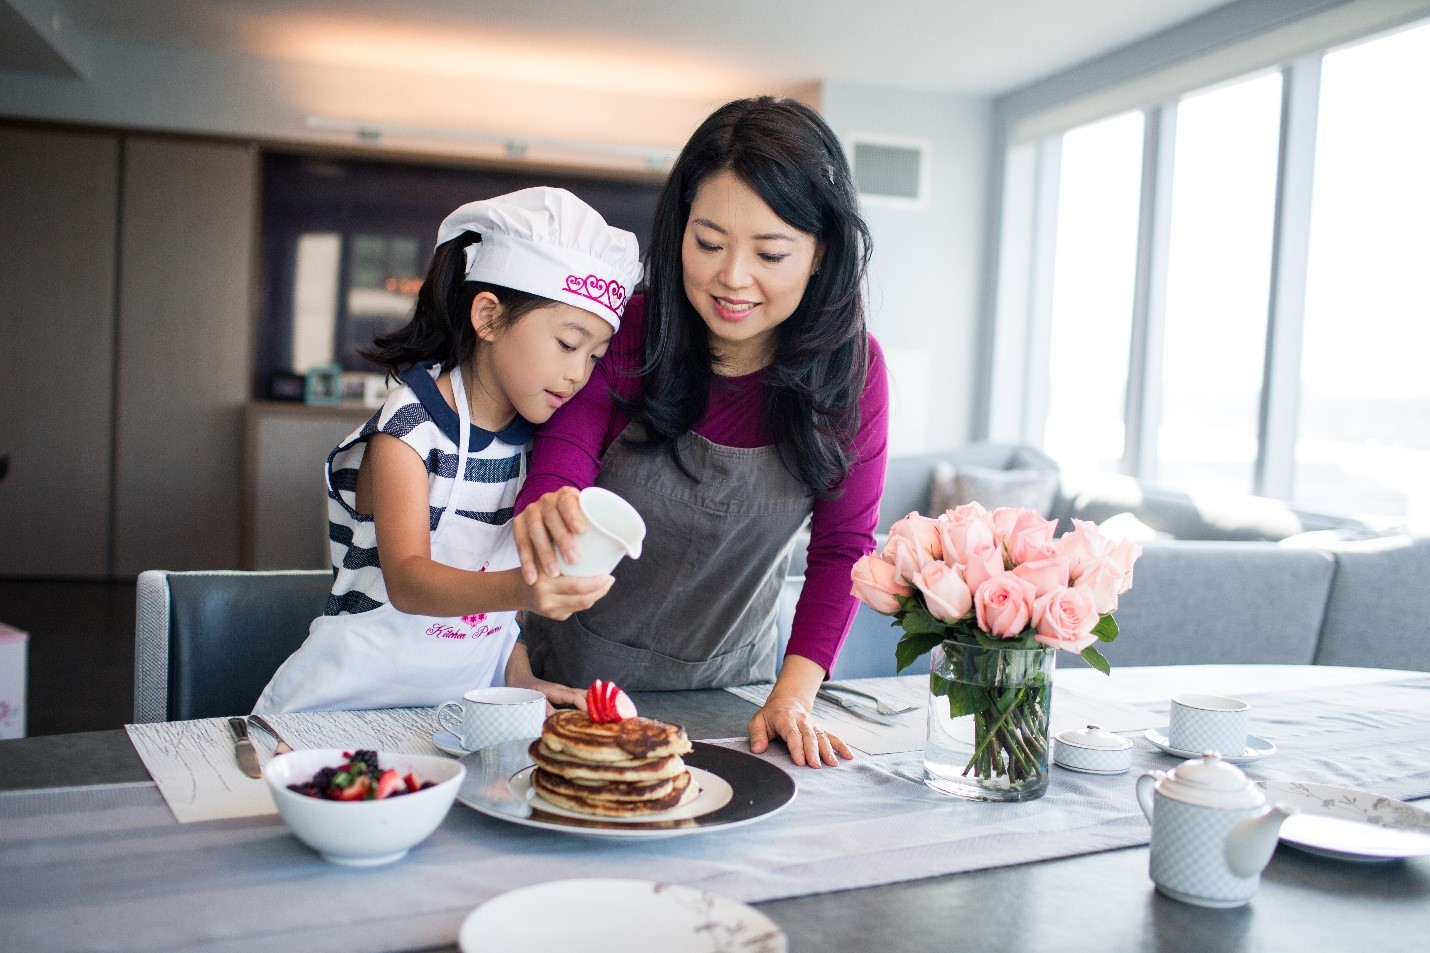
One of my secrets in the kitchen is incorporating math while teaching my daughter how to cook. Cooking is a terrific way to introduce simple mathematical concepts, allowing children to begin conceptualizing and understanding addition, multiplication, fractions, number order, ratios and more.
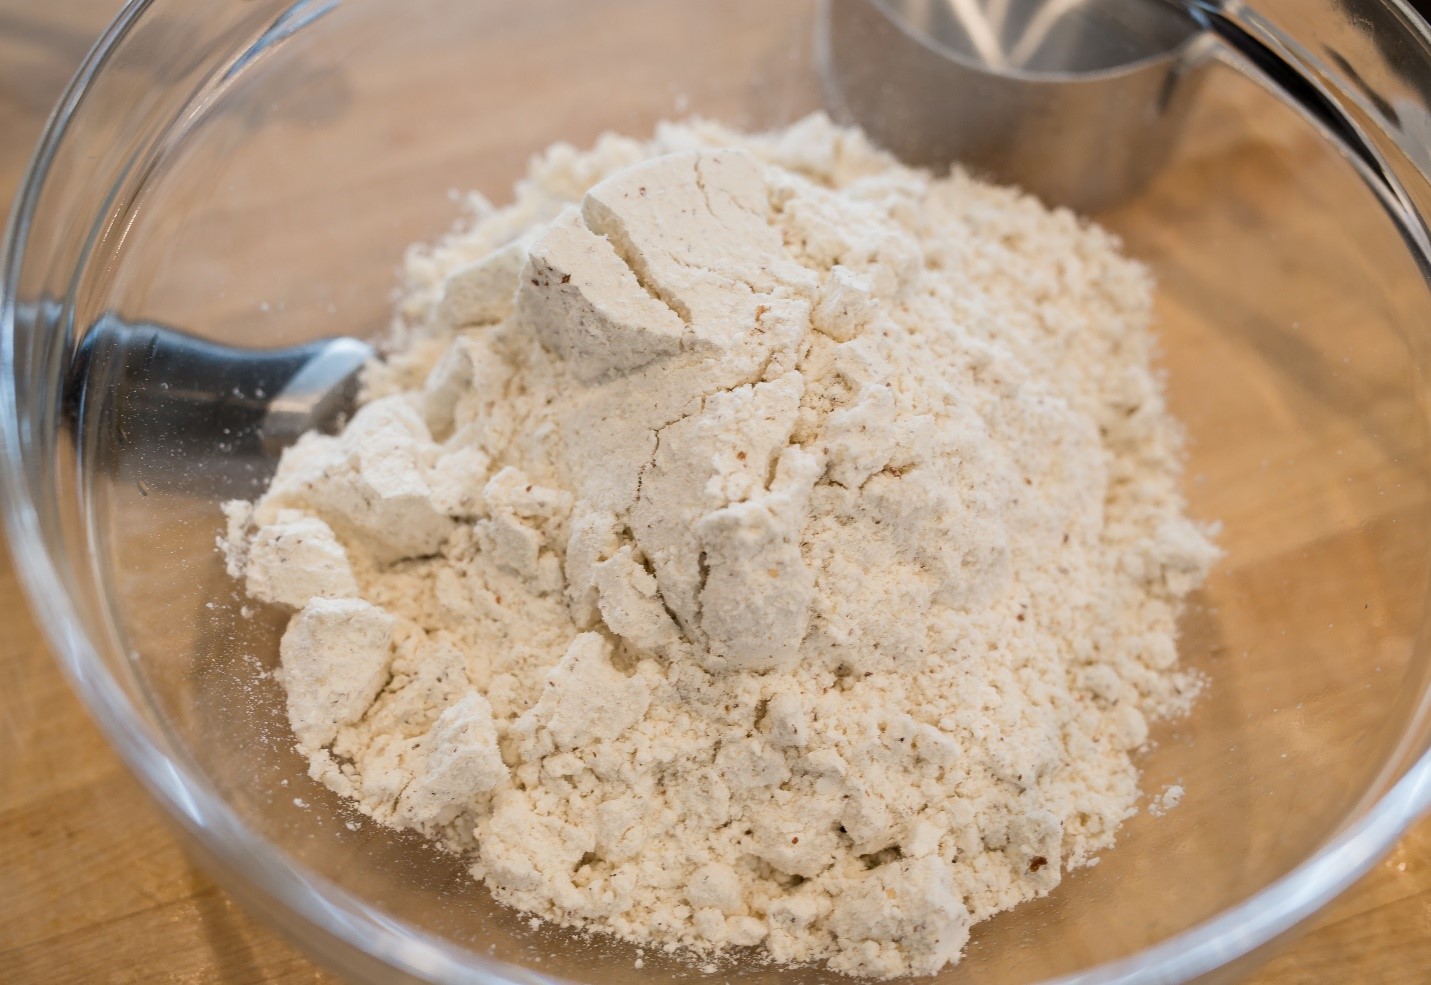
So what is a good recipe that’s doable for kids? Pancakes! Our family eats gluten-free, so we use a pancake mix called Pamela’s Baking & Pancake Mix, found on Amazon at the link below. It tastes so good that even my friends who aren’t gluten-free absolutely LOVE it. It comes with simple, mistake-proof instructions on the back.


How do I use pancakes to teach math? First, I ask my daughter to measure how many cups of the mix we need to make for the number of people we plan to serve. If the package says you need 1 cup of the mix for 4 people, how many cups do we need for 8 people? Voila – 2 cups it is!
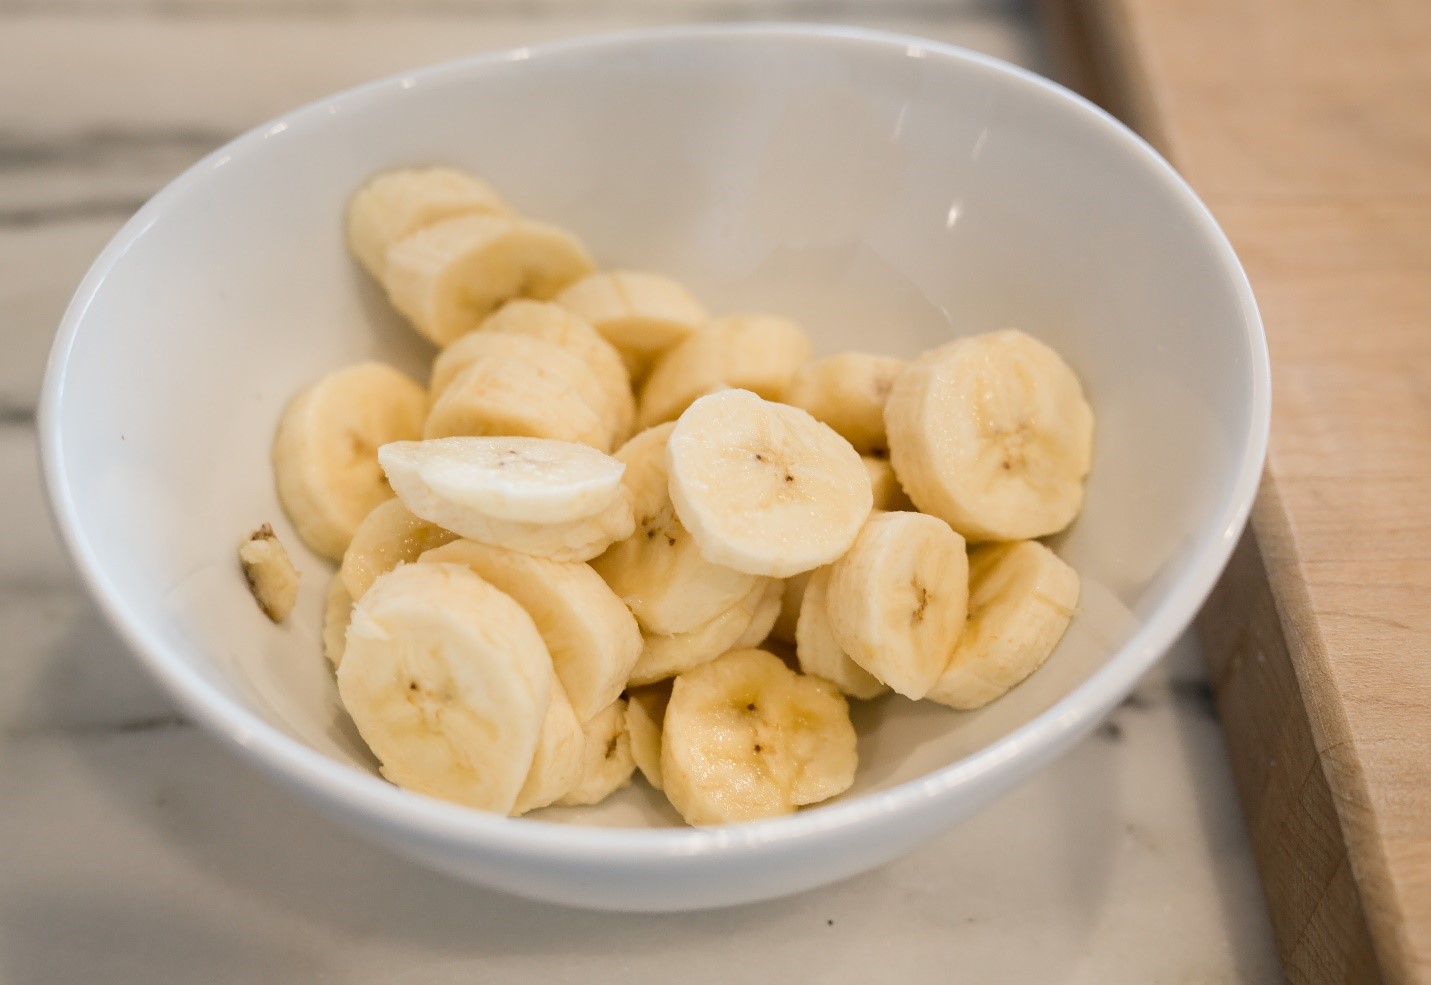
We love adding bananas into the pancakes – it naturally adds that extra sweetness. I ask my daughter to slice the bananas into equal parts, which teaches basic division and cutting skills. If each pancake needs 5 slices of banana, how many do we need to make 8 pancakes? 40 banana slices!
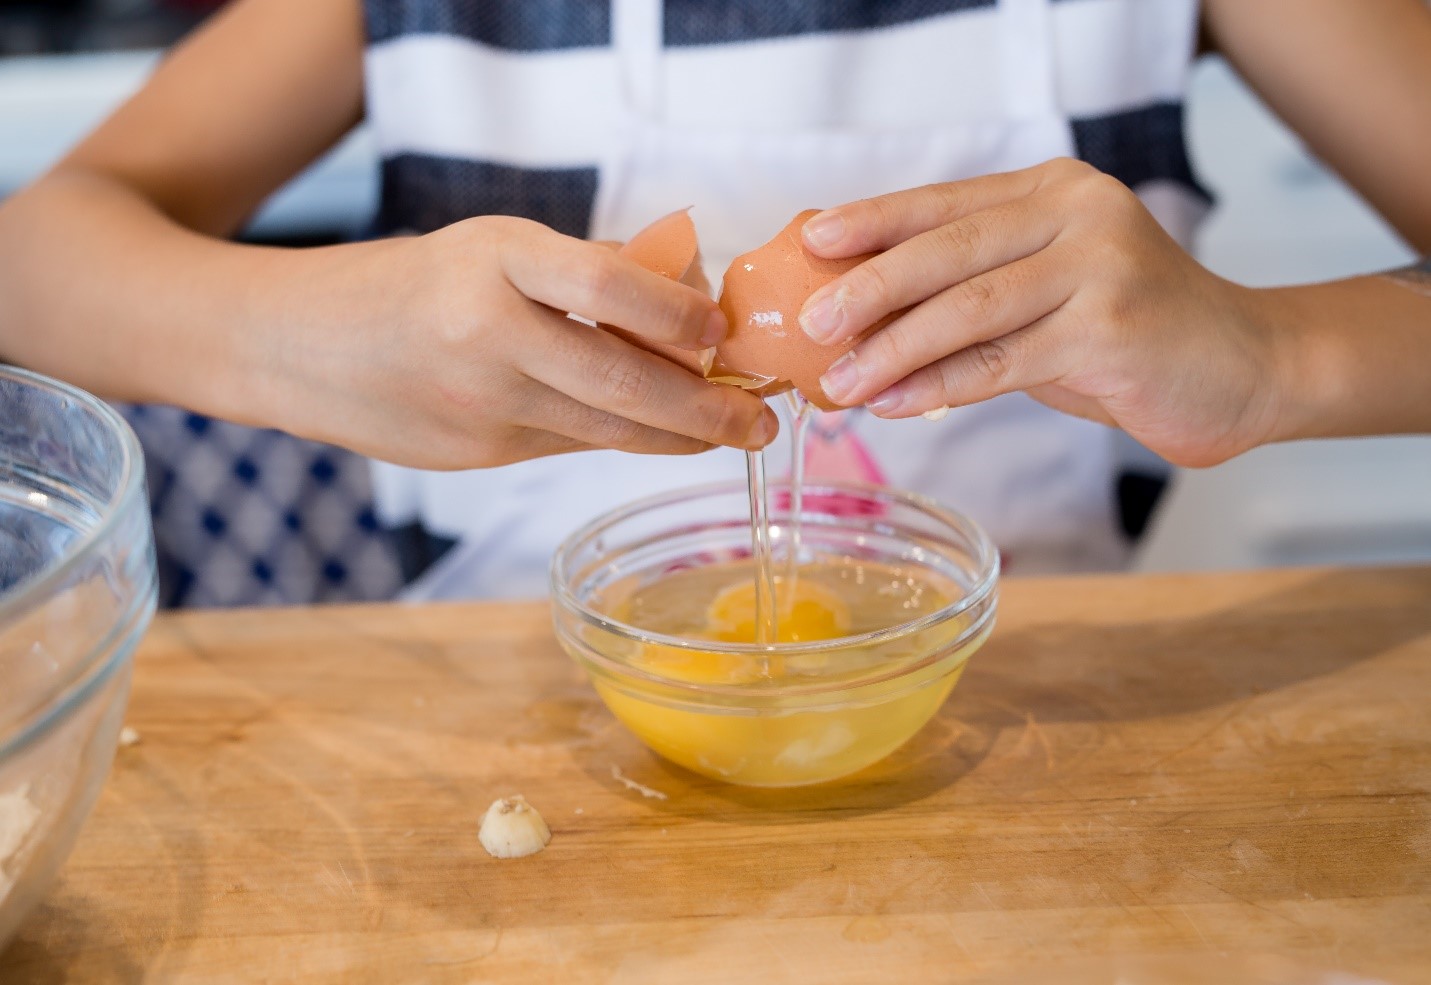
Next, we add the eggs. Encourage your child read the directions on the package to decipher the amount needed.
Make sure to use another bowl to crack the eggs, since little pieces of shell can fall into the mixing bowl. You can also introduce a concept called mise en place, a French culinary term that means “everything in its place”, so that your family can cook more efficiently and safely.
Time to mix the batter! Kids LOVE this part – one less task for the parent!

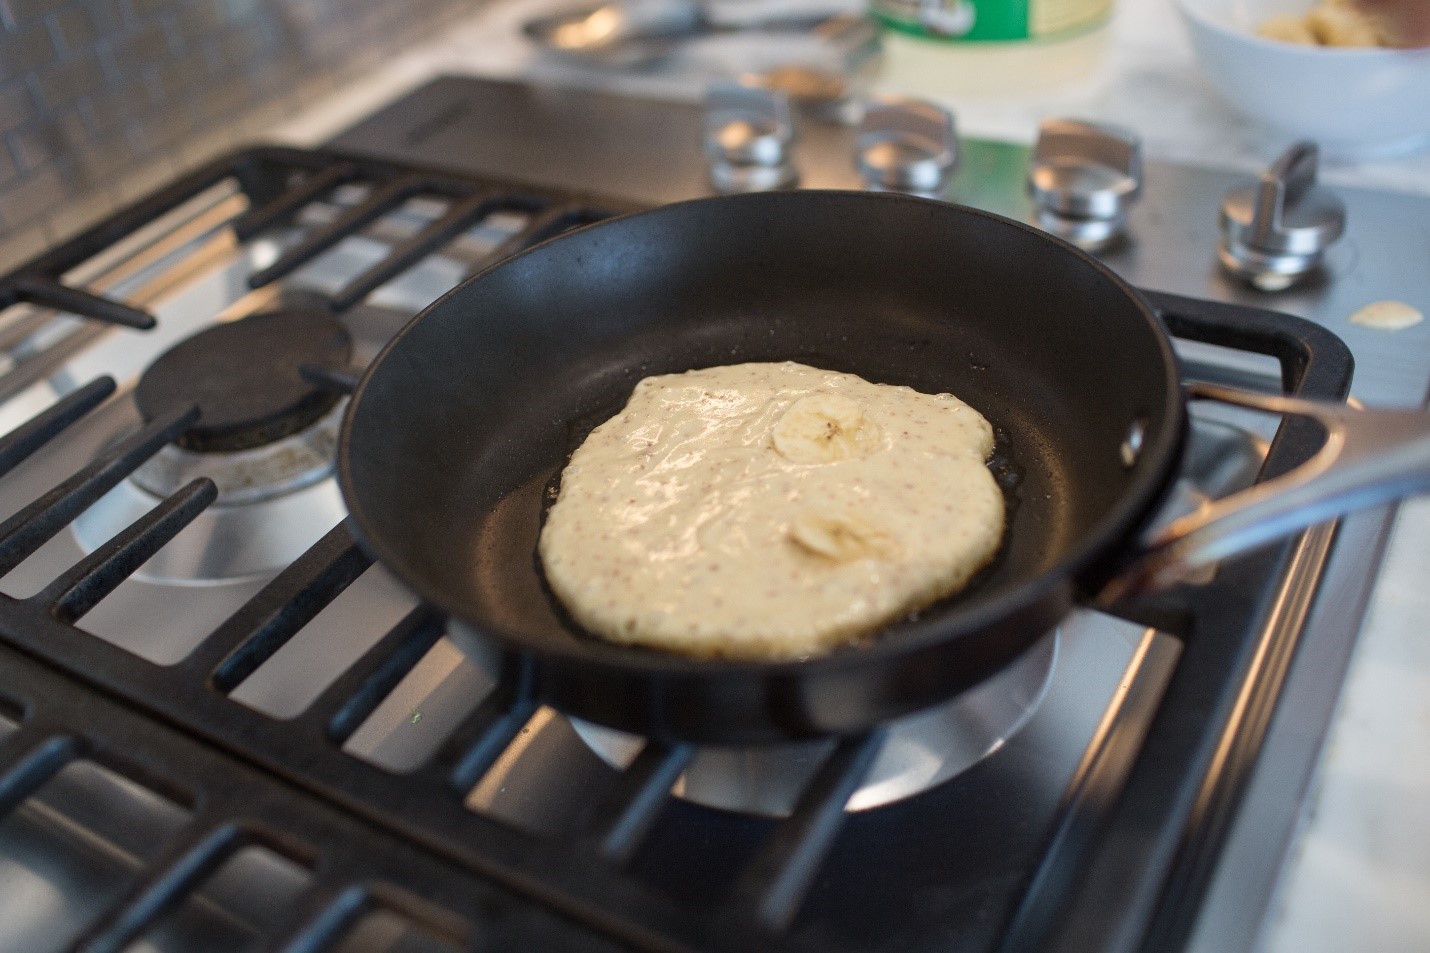
Fire up the stove, use a little coconut oil in your pan to give the pancakes a nutty flavor, and scoop your batter into the pan. You should wait until bubbles form at the edge of the pancake as it cooks, and then flip it just once.
An opportunity to instill patience!
Now the best part – pouring maple syrup on top!
Sometimes I ask my daughter to cut the pancakes in halves or quarters as a serving size, which illustrates division in a real-world way.
You can also add blueberries, walnuts and other ingredients of your choosing. Kids love chocolate, of course. I like to use Enjoy Life Chocolate Chips, which can also be found on Amazon below. They’re dairy-free, soy-free and nut-free.


And there you have it! In just 20-30 minutes, thoroughly delicious and healthy pancakes for the family! Plus, we learned some math along the way! It’s become one of my favorite activities to do on a Saturday morning. The most important part is the quality time – be creative and have fun with it together!
Cheers to joyful eating,
Clara
This rainbow fruit snack is good for your body and your brain. When kids copy a pattern, like the colors in a rainbow, they get smarter at math. When kids put fruit on skewers, they strengthen the finger muscles they’ll need for writing.
To make these snacks, you’ll need:
• Wooden skewers
• A couple of plates
• A large plate or platter to build the rainbow on
• Fruit
You can choose whichever fruits you like. Pick one for each color in your rainbow.
Examples: strawberries for red, orange slices for orange, pineapple chunks for yellow, green grapes for green, blueberries for blue and purple grapes for purple.
Safely poke the skewer through the fruit by laying the fruit on your platter, and poke the skewer down. Then, push the fruit up.
Grapes and other large chunks of fruit can be choking hazards for young children. It’s best to cut small fruit pieces and cut the grapes in half before eating.
]]>